Sign-in and people
Let your team sign in with SSO or GitHub, decide who may join, and manage roles and API tokens.
People sign in with your identity provider or GitHub. Admins decide who may join. Pistis refuses and logs anyone it can't place.
Add a sign-in method
- Open
Sign-in methods→Add OpenID Connect, orSign-in methods→Add GitHubfor a GitHub OAuth app. - Copy the callback URL the page shows,
<publicUrl>/auth/<id>/callback, into your provider. - Enter the issuer, client ID and client secret from your provider.
- Click
Save. The secret is encrypted and never shown again.
OpenID Connect works with Google, Okta, Microsoft Entra, Keycloak, GitLab and other providers. GitHub sign-in uses the account's verified primary email. You can also list sign-in methods under signIn in pistis.json.
Decide who may join
- Open
Control center→People. - Under Who may sign in, enter your email domain, such as
acme.com, and pick the role new people get (Member unless you choose another). - Click
Add rule. Everyone with a verified email at that domain can now sign in, with that role.
To let in one person, enter their email under Invite one person, pick their role and click Invite. Anyone else sees "You are not allowed to sign in here." An unverified email never matches.
Roles
What someone may do is their role: a name and a set of permissions. Each person has one role. Change it from the menu on their row in Control center → People: it saves at once, says so with Undo, and applies from their next click or call, with no need to sign out. Pistis comes with two:
- Admin has every permission, including any added later. It can't be changed or deleted.
- Member is what everyone else gets: start and share sessions, run flows, and use Pistis from MCP clients with full access. You can change what it allows; it keeps its name.
To make a role for a job, open People › Roles, click New role, name it and tick what it allows. Each permission says in one line what it lets someone do:
| Group | Permissions |
|---|---|
| Sessions | Start sessions · Share sessions · Manage sessions (stop or end anyone's session) |
| Flows | Run flows · Build flows (create, edit, delete, and act for runs nobody started) |
| Agents | Edit agents |
| MCP clients | None, Read-only or Full access (see MCP) |
| Administration | Models · People & roles · Source control · MCP servers · Sign-in · Workers · Usage & fleet · Audit log |
An Auditor with only Usage & fleet and Audit log, for example, sees the overview, usage, fleet and the audit log and nothing else: the sidebar and the palette list only those pages, and the others answer 403 with the role that's missing. People & roles lets someone give anyone any role, Admin included, so give it only to people you'd make admins. Usage & fleet also lets someone see anyone's session and its sandbox, but not read, message, approve, stop or end it; Manage sessions lets someone end anyone's session or take over its screen. A role that had Usage & fleet before Manage sessions existed was given it too, so nobody lost anything.
Two things are refused so nobody gets locked out: the last admin can't be given another role or be disabled, and a role can't be deleted while anyone has it or a sign-in rule gives it; the page says who. Sharing one session with someone (viewer, collaborator, approver) works on top of their role.
Every action in the web app, the API and MCP is checked against the person's role, and anything unclear is refused. Every change to people and roles, and every refusal, is in the Control center → Audit log with who did it. Over HTTP: GET /admin/api/people, PUT /admin/api/people/{id}/role, and GET, POST, PATCH, DELETE on /admin/api/roles (see the HTTP reference).
Spending limits
Usage shows what each person's sessions spend on models. A limit caps it, in US dollars, per day and per month (UTC days and calendar months). Whoever may manage People & roles sets them:
- For one person: in
Control center→People, click the Spending entry on their row, enter a daily or monthly amount, and clickSave limit. The row shows what they spent of it. - For a role: on People › Roles, open the role and fill in Spending limit. It applies to each person with that role. A person's own limit replaces their role's.
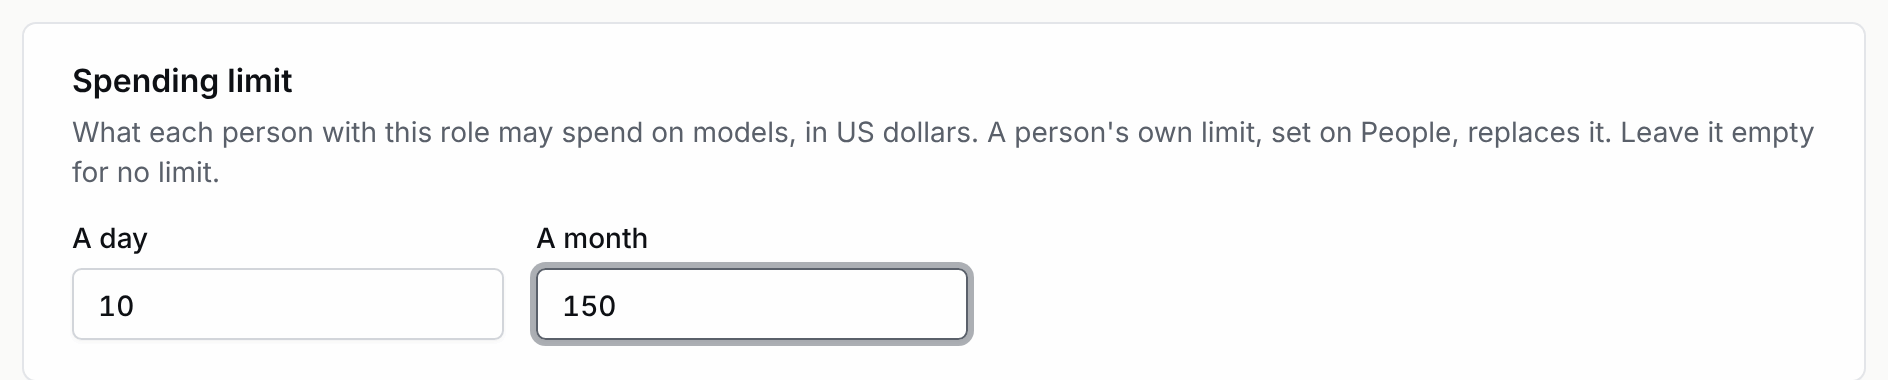
What a session spends counts toward its owner's limit, whoever sent the message. At the limit:
- New work is refused in plain words: whose limit, how much was spent, and who can raise it. That goes for a new session, a message, and anything that arrives from a pull request.
- A running turn finishes the step it is on (a command is never cut off) and then waits. The session shows Spending limit reached and needs someone, with a card saying who can raise it.
- Raise the limit, or wait for the next day or month, and waiting sessions go on by themselves.
If Pistis can't read what was spent (the database is unreachable), it refuses new work rather than guess. Every change to a limit is in the Control center → Audit log, and Control center → Usage shows each person's limit next to their spend. Over HTTP: PUT /admin/api/people/{id}/limits and PUT /admin/api/roles/{id}/limits with {"daily": 5, "monthly": 50}; leave one out for no limit.
The first administrator
The first time Pistis starts with nobody to administer it, it prints a setup link. Whoever opens it and types a name becomes an admin. The link works once and expires after an hour. It goes to the server's log, so anything that collects your logs has it until it is used: open it as soon as you start. Later starts don't print it again; they say how to get a new one from the server's shell.
If you are locked out, run this on the server. It prints a one-time sign-in link:
pnpm pistis admin link --config pistis.json --new-admin <name>API tokens
- Open
Your name→API tokens→Create token. - Copy the token. It starts with
pst_and is shown once. - Send it as
Authorization: Bearer pst_…. It acts as you.
Click Revoke to stop a token at once.